在开始实际开发之前,我们需要做一些准备工作。
¥Before we dive in to the actual development, we need to do some preparation work.
步骤 1:安装(Step 1: Installation)
¥Step 1: Installation
Android 设置(Android setup)
¥Android setup
你需要在你的机器上安装 Android Studio 和 Android 平台 SDK。你可以先 下载 Android Studio 见此处,然后按照这些 安装步骤 操作。
¥You will need to install Android Studio and the Android platform SDK on your machine. You can download the Android Studio here and follow these installation steps afterwards.
确保安装 Android SDK 后接受其许可证。打开终端,转到 SDK 安装文件夹(tools/bin),然后调用
sdkmanager --licenses。¥Make sure that after you install the Android SDK you then accept its licenses. Open the terminal and go to the folder where the SDK was installed, in tools/bin and call
sdkmanager --licenses.
警告
环境变量 ANDROID_HOME 已被弃用,并被 ANDROID_SDK_ROOT 取代。根据你的 Android Studio 版本,你可能需要其中之一。同时设置两者也无妨。
¥The environmental variable ANDROID_HOME has been deprecated and replaced with ANDROID_SDK_ROOT. Depending on your version of Android Studio you may need one or the other. It doesn’t hurt to have both set.
将 Android 安装添加到你的路径:
¥Add Android installation to your path:
Unix(macOS、Linux)(Unix (macOS, linux))
export ANDROID_HOME="$HOME/Android/Sdk"
export ANDROID_SDK_ROOT="$HOME/Android/Sdk"
PATH=$PATH:$ANDROID_SDK_ROOT/tools; PATH=$PATH:$ANDROID_SDK_ROOT/platform-tools请注意,有时
/Android/Sdk文件夹会添加到用户文件夹中的/Library/文件夹内。检查你的用户文件夹,如果/Android/文件夹仅位于/Library/中,请执行以下操作:请改为export ANDROID_SDK_ROOT="$HOME/Library/Android/Sdk"或export ANDROID_HOME="$HOME/Library/Android/Sdk"。¥Please note that sometimes the
/Android/Sdkfolder is added inside/Library/inside your user folder. Check your user folder and if the/Android/folder is only inside/Library/do:export ANDROID_SDK_ROOT="$HOME/Library/Android/Sdk"orexport ANDROID_HOME="$HOME/Library/Android/Sdk"instead.
Windows(Windows)
setx ANDROID_HOME "%USERPROFILE%\AppData\Local\Android\Sdk"
setx ANDROID_SDK_ROOT "%USERPROFILE%\AppData\Local\Android\Sdk"
setx path "%path%;%ANDROID_SDK_ROOT%\tools;%ANDROID_SDK_ROOT%\platform-tools"启动 Android Studio(检查安装文件夹中的可执行文件)。下一步是安装各个 SDK:
¥Start Android studio (check the executable in the folder that you installed it in). Next step is to install the individual SDKs:
打开窗口底部的 “配置” 菜单:
¥Open the “Configure” menu at the bottom of the window:

选择所需的 SDK,然后单击 “适用” 以安装 SDK。
¥Select the desired SDKs and click on “Apply” to install the SDKs.

iOS 设置(iOS setup)
¥iOS setup
你需要一个安装了 Xcode 的 macOS 系统。安装完成后,打开 Xcode 获取许可证提示。接受许可证,然后你可以关闭它。
¥You will need a macOS with Xcode installed. After you’ve installed it, open Xcode in order to get the license prompt. Accept the license, then you can close it.
CocoaPods(CocoaPods)
如果你尚未安装 CocoaPods,请使用以下命令安装:sudo gem install cocoapods。否则,你可能会在开发或构建过程中遇到错误,例如:
¥If you haven’t installed CocoaPods, please install it by using the command: sudo gem install cocoapods. Otherwise, you may encounter errors during development or building, such as:
终端警告
[警告] 由于未安装 CocoaPods,跳过 pod 安装
¥[warn] Skipping pod install because CocoaPods is not installed,
Xcode 错误
/path-to/your-project/src-capacitor/ios/App/Pods/Target Support Files/Pods-App/Pods-App.debug.xcconfig:1:1 无法打开配置设置文件
¥/path-to/your-project/src-capacitor/ios/App/Pods/Target Support Files/Pods-App/Pods-App.debug.xcconfig:1:1 unable to open configuration settings file
步骤 2:添加 Capacitor Quasar 模式(Step 2: Add Capacitor Quasar Mode)
¥Step 2: Add Capacitor Quasar Mode
为了开发/构建移动应用,我们需要将 Capacitor 模式添加到我们的 Quasar 项目中。这将使用 Capacitor CLI 在 /src-capacitor 文件夹中生成一个 Capacitor 项目。
¥In order to develop/build a Mobile app, we need to add the Capacitor mode to our Quasar project. This will use the Capacitor CLI to generate a Capacitor project in /src-capacitor folder.
$ quasar mode add capacitor步骤 3:开始开发(Step 3: Start Developing)
¥Step 3: Start Developing
要使用 HMR 启动开发服务器,请运行以下命令:
¥To start a dev server with HMR, run the command below:
$ quasar dev -m capacitor -T [android|ios]开发服务器准备就绪后,你的 IDE(Android Studio 或 Xcode)将打开,你可以从中手动选择模拟器(或同时选择多个模拟器!)并在模拟器上安装开发应用。你还可以在连接的移动/平板设备上运行开发应用。
¥Once the dev server is ready, your IDE will open (Android Studio or Xcode) and from there you can manually select the emulator (or multiple ones simultaneously!) and install the dev app on it/them. You can also run the dev app on a connected mobile/tablet device.
警告
在 Android Studio 中,你将收到一条建议升级 Gradle 版本的消息。请勿升级 GRADLE,因为它会破坏 Capacitor 项目。其他任何请求的升级也相同。
¥In Android Studio, you will be greeted with a message recommending to upgrade the Gradle version. DO NOT UPGRADE GRADLE as it will break the Capacitor project. Same goes for any other requested upgrades.

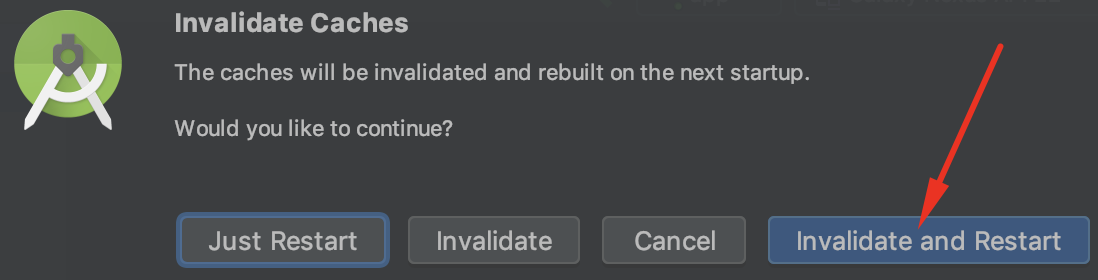
如果你遇到任何 IDE 错误,请点击“文件”>“使缓存无效”,然后重新启动。
¥If you encounter any IDE errors then click on File > Invalidate caches and restart.