开发(Developing)
¥Developing
只需一个命令即可开始开发浏览器扩展程序。
¥Start developing a Browser Extension with just one command.
$ quasar dev -m bex -T [chrome|firefox]

# ..or the longer form:
$ quasar dev --mode bex -T [chrome|firefox]你可能已经拥有或还没有 src-bex 文件夹,但现在肯定有一个。现在我们已经创建了开发环境,我们需要将生成的浏览器扩展程序加载到你的浏览器中。
¥You may or may not have already had a src-bex folder, but you will definitely have one now. Now that we’ve created a development environment, we need to load generated browser extension into your browser.
在开发 BEX 时,你会注意到 Quasar CLI 会在 dist 文件夹中构建实际的扩展程序(通常根据 “quasar dev” 命令中的 dev 目标位于 /dist/bex-chrome--dev/ 或 /dist/bex-firefox--dev 中):
¥While you develop your BEX, you will notice that Quasar CLI builds the actual extension in the dist folder (normally in /dist/bex-chrome--dev/ or /dist/bex-firefox--dev based on the dev target in “quasar dev” command):
Chrome(Chrome)
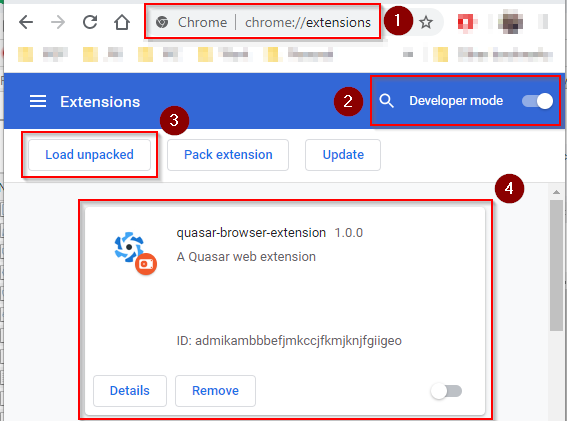
根据上面的屏幕截图,必须采取以下步骤:
¥In line with the screenshot above, the following steps must be taken:
在 Chrome 中,导航至
chrome://extensions¥In Chrome, navigate to
chrome://extensions切换 “开发者模式”。
¥Toggle “Developer Mode”.
点击 “加载解压后的插件”。这将显示文件夹选择对话框。找到并选择你的
/dist/bex-chrome--dev/文件夹。¥Click “Load unpacked”. This will present you with the folder selection dialog. Navigate to and select your
/dist/bex-chrome--dev/folder.现在你应该看到你的 BEX 已挂载在 Chrome 中。
¥You should now see your BEX mounted in Chrome.
更多关于调试 Chrome 浏览器扩展程序的信息,请参阅 官方文档。
¥More information about debugging Chrome Browser Extensions can be found in the official documentation.
其他 Chromium 浏览器(Other Chromium Browsers)
¥Other Chromium Browsers
虽然我们尚未测试所有基于 Chromium 的浏览器,但 BEX 模式应该与它们兼容。请参阅相应的浏览器文档,了解如何向特定浏览器添加浏览器扩展。
¥Although we haven’t tested all the various Chromium based browsers, BEX mode should be compatible with them. Please refer to the appropriate browser documentation on how to add a browser extension to that particular browser.
Firefox(Firefox)
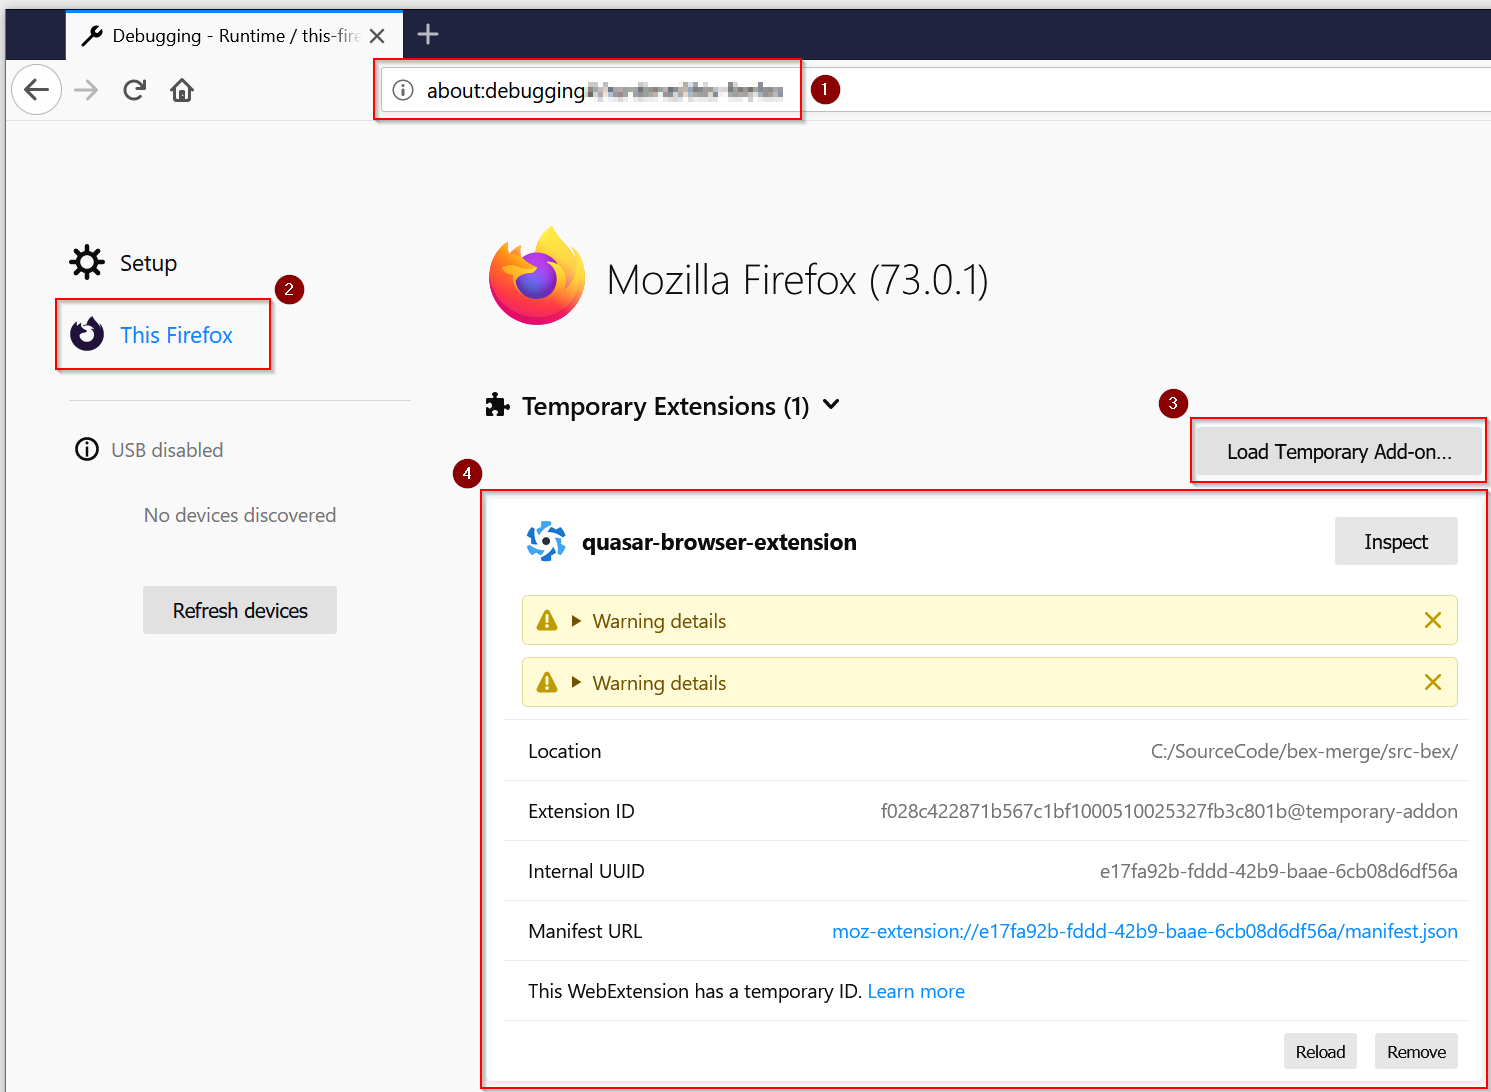
根据上面的屏幕截图,必须采取以下步骤:
¥In line with the screenshot above, the following steps must be taken:
在 Firefox 中,导航至
about:debugging¥In Firefox, navigate to
about:debugging点击 “此 Firefox”
¥Click on “This Firefox”
点击 “加载临时插件……”。这将显示文件选择对话框。找到并选择你的
/dist/bex-firefox--dev/manifest.json文件。注意:Firefox 需要清单文件,而不是像 Chromium 浏览器那样需要/dist/bex-firefox--dev文件夹。¥Click “Load Temporary Add-on…”. This will present you with the file selection dialog. Navigate to and select your
/dist/bex-firefox--dev/manifest.jsonfile. Note: Firefox requires the manifest file, not the/dist/bex-firefox--devfolder like Chromium browsers.现在你应该看到你的 BEX 已挂载在 Firefox 中。
¥You should now see your BEX mounted in Firefox.
更多关于调试 Firefox 临时插件的信息,请参阅 Firefox 扩展研讨会。
¥More information about debugging Firefox temporary addons can be found in the Firefox Extension Workshop.
模块热重载 (HMR)(Hot Module Reloading (HMR))
¥Hot Module Reloading (HMR)
使用 Chrome 浏览器将获得最佳的开发者体验。我们已成功使 HMR 完全支持它:
¥The best developer experience that you will have is with Chrome. We’ve managed to make HMR fully work for it:
devtools/options/popup 页面的完整 HMR
¥Full HMR for devtools/options/popup page
更改后台脚本时,扩展程序将自动重新加载。
¥When changing the background script, the extension will automatically reload.
更改内容脚本时,扩展程序将自动重新加载,并且使用这些内容脚本的标签页将自动刷新。
¥When changing a content script, the extension will automatically reload & the tabs using those content scripts will auto-refresh.
弹出窗口/页面无需完整编译。相反,你将能够受益于仅针对浏览器请求的文件进行即时编译,速度非常快。
¥The popup/page will not need to be compiled in its entirety. Instead, you will be able to benefit from on-the-fly compilation only for the browser requested files, which is VERY fast.
另一方面,我们无法为 Firefox 提供相同的体验。但是,Firefox 会监视文件更改,并尝试在发生更改时自动重新加载扩展程序,但上述 HMR 功能(针对 Chrome 指定)均不起作用。
¥On the other hand, we cannot offer the same experience for Firefox too. However, Firefox watches for file changes and tries to auto-reload the extension on changes, but none of the HMR features above (specified for Chrome) will work.
调试(Debugging)
¥Debugging
浏览器扩展程序在三种不同的环境中运行(更多信息请参阅后续页面),并且需要各种环境进行调试。
¥Browser extensions runs in three different environments (more on upcoming pages) and it requires various environments for debugging.
使用 Chrome(With Chrome)
¥With Chrome
你可以在 DevTools 的控制台中找到以下位置来调查错误和输出:
¥You can find following places to investigate the errors and outputs from the console in DevTools:
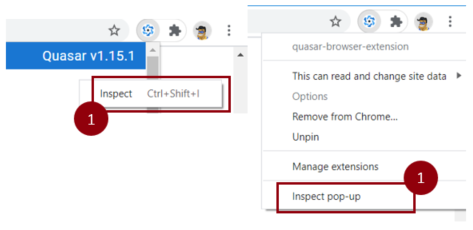
弹出窗口 - 右键单击页面或扩展程序图标,然后选择
Inspect popup以启用 DevTools。¥Popup - right click on the page or on the extension icon and choose
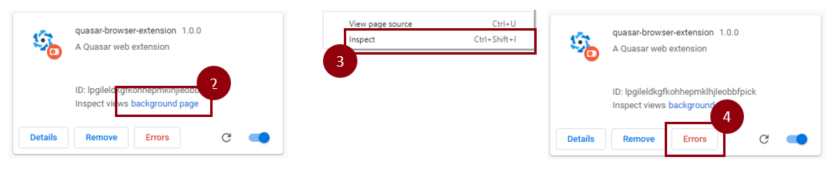
Inspect popupfor DevTools.后台脚本(例如:background-hooks.js) - 从
Manage extensions - background page打开 DevTools。¥Background scripts (e.g.: background-hooks.js) - open DevTools from
Manage extensions - background page.内容脚本 - 脚本注入的页面。
¥Content scripts - page where your script is injected.
扩展错误 - 列表与扩展程序相关的错误(例如清单配置)在
Manage extension - Errors中可用。¥Extension Errors - list of errors related to the extension (e.g. manifest configuration) are available in
Manage extension - Errors.
如果你的代码更改未传播到浏览器,你可以尝试:* 更新或重新加载扩展 - 来自扩展列表(屏幕截图) - 重启浏览器 - 重启开发进程
¥If your code changes are not propagated to the browser you can try to:
- Update or Reload extension - from the Extensions list (screenshots)
- Restart browser
- Restart dev process
有关更多信息,请访问 调试扩展。
¥For more information, please visit Debugging extensions.
生产环境构建(Building for Production)
¥Building for Production
$ quasar build -m bex -T [chrome|firefox]

# ..or the longer form:
$ quasar build --mode bex -T [chrome|firefox]系统将指示你选择输出文件夹。通常情况下,根据 “quasar 构建” 命令指定的目标,需要 /dist/bex-chrome/ 和 /dist/bex-firefox。
¥You will be instructed which is the output folder. Normally, it’s /dist/bex-chrome/ and /dist/bex-firefox, based on the target specified for the “quasar build” command.
提示
如果你想测试 your-project-name.zip 文件,可以通过将文件拖放到你在开发模式下加载扩展程序的同一位置来完成此操作;适用于 Chrome chrome://extensions 和 Firefox about:debugging。有关更多信息,请参阅上面的开发屏幕截图。
¥If you want to test out the your-project-name.zip file, you can do this by dragging the file into the same place you load the Extension in development mode; for Chrome chrome://extensions and Firefox about:debugging. See the development screenshots above for more information.
关于压缩的说明(A Note on Minification)
¥A Note on Minification
Chrome 和 Firefox 浏览器扩展的审核流程中,部分内容必须允许相关团队检查部署为实时扩展的代码。考虑到这一点,不允许使用压缩代码。为了便于审核,Quasar 不会对浏览器扩展的构建代码进行混淆和压缩。
¥Part of the review process for Browser Extensions in both Chrome and Firefox must allow the relative teams to examine the code being deployed as a live extension. With this in mind, minified code is not allowed. So, to allow for the review process, Quasar will not obfuscate and minify the built code for Browser Extensions.
由于任何扩展程序都将直接在用户的计算机上运行,因此上传速度不是需要担心的因素,因此无需压缩代码。
¥Given any extension will be ran directly on the user’s computer, upload speed isn’t a factor to worry about here, so minifying the code isn’t necessary.
发布到存储(Publishing to the Stores)
¥Publishing to the Stores
由于 Quasar 免除了构建和打包浏览器扩展的负担,因此一旦你完成扩展的开发,就可以发布。不同浏览器的发布过程有所不同,但官方文档将指导你完成整个过程。
¥Since Quasar removes the burden of building and packaging your Browser Extension, once you are finished developing your extension, it is ready to be published. The publishing process differs between browsers, but the official documentation will guide you through the process.
Chrome - 发布 Chrome 浏览器扩展
¥Chrome - Publishing a Chrome Browser Extension
Firefox - 发布 Firefox 插件(浏览器扩展)
¥Firefox - Publishing a Firefox Add On (Browser Extension)
提示
BEX 模式应与所有基于 Chromium 的浏览器兼容。请参阅其关于发布扩展的相关文档。
¥BEX mode should be compatible with all chromium based browsers. Please refer to their relative documentation on publishing extensions.