在开始实际开发之前,我们需要做一些准备工作。
¥Before we dive into the actual development, we need to do some preparation work.
步骤 1:安装(Step 1: Installation)
¥Step 1: Installation
第一步是确保你已安装 Cordova CLI 和必要的 SDK。
¥The first step is to make sure you got the Cordova CLI installed and the necessary SDKs.
$ npm install -g cordova警告
根据你的 Android Studio 版本,你可能需要重新启用 “Android SDK 工具”。你可以通过转到 “工具 > SDK 管理器 > SDK 工具”,然后取消勾选 “隐藏过时的软件包” 并勾选 “Android SDK 工具(已过时)” 来实现。以下说明假定已完成此操作。
¥Depending on your version of Android Studio, you might need to re-enable the “Android SDK Tools”. You can do this by going to “Tools > SDK Manager > SDK Tools” then un-ticking “Hide Obsolete Packages” and ticking “Android SDK Tools (Obsolete)”. The instructions below assume this has been done.
警告
环境变量 ANDROID_HOME 已被弃用,并被 ANDROID_SDK_ROOT 取代。根据你的 Android Studio 版本,你可能需要其中之一。同时设置两者也无妨。
¥The environmental variable ANDROID_HOME has been deprecated and replaced with ANDROID_SDK_ROOT. Depending on your version of Android Studio you may need one or the other. It doesn’t hurt to have both set.
Android 设置(Android Setup)
¥Android Setup
完成此步骤后,你需要在你的设备上安装 Android 平台 SDK。你可以先 下载 Android Studio 见此处,然后按照这些 安装步骤 操作。
¥After this step you will need to install the Android platform SDK on your machine. You can download the Android Studio here and follow these installation steps afterward.
确保安装 Android SDK 后接受其许可证。打开终端,转到 SDK 安装文件夹(tools/bin),然后调用
sdkmanager --licenses。¥Make sure that after you install the Android SDK you then accept its licenses. Open the terminal and go to the folder where the SDK was installed, in tools/bin, and call
sdkmanager --licenses.将 Android 安装添加到你的路径:
¥Add Android installation to your path:
Unix(macOS、Linux)(Unix (macOS, Linux))
export ANDROID_HOME="$HOME/Android/Sdk"
export ANDROID_SDK_ROOT="$HOME/Android/Sdk"
export PATH=$PATH:$ANDROID_SDK_ROOT/tools; PATH=$PATH:$ANDROID_SDK_ROOT/platform-tools请注意,有时
/Android/Sdk文件夹会添加到用户文件夹中的/Library/文件夹内。检查你的用户文件夹,如果/Android/文件夹仅位于/Library/中,请执行以下操作:请改为export ANDROID_SDK_ROOT="$HOME/Library/Android/Sdk"或export ANDROID_HOME="$HOME/Library/Android/Sdk"。¥Please note that sometimes the
/Android/Sdkfolder is added inside/Library/inside your user folder. Check your user folder and if the/Android/folder is only inside/Library/do:export ANDROID_SDK_ROOT="$HOME/Library/Android/Sdk"orexport ANDROID_HOME="$HOME/Library/Android/Sdk"instead.
Windows(Windows)
安装 Android Studio 后,你需要再安装两个软件:
¥After installing Android Studio, you need to install two more pieces of software:
Oracle 的 JDK。可以在 此处 中找到
¥JDK from Oracle. It can be found here
Gradle。它以前可以在 Android Studio 中使用,但现在必须单独安装。Cordova 需要特定版本。你可以下载 此处
¥Gradle. It used to be usable from Android Studio but now you have to install it separately. There is a particular version that Cordova requires. You can download it here
然后,你需要设置环境变量。你需要设置以下变量。Cordova 已经有了很好的指南。可以在 此处 中找到。你需要:
¥Then you will have to set environment variables. You will need to set the following variables. Cordova has a good guide for it already. It can be found here. You need to:
添加
ANDROID_SDK_ROOT。可以安全地将其设置为:“%USERPROFILE%\AppData\Local\Android\Sdk”¥add
ANDROID_SDK_ROOT. It can safely be set to: “%USERPROFILE%\AppData\Local\Android\Sdk”将两个
ANDROID_SDK_ROOT目录添加到你的路径:%ANDROID_SDK_ROOT%\tools;%ANDROID_SDK_ROOT%\platform-tools¥add two
ANDROID_SDK_ROOTdirectories to your path: %ANDROID_SDK_ROOT%\tools;%ANDROID_SDK_ROOT%\platform-tools将 Gradle 添加到你的路径。请注意,Gradle 没有安装程序。你只需将二进制文件放在你想要的位置,然后将 bin 目录添加到你的路径中。
¥add Gradle to your path. Note that Gradle does not have an installer. You just put the binary files where you want them, then add the bin directory to your path.
添加
JAVA_HOME。它的值取决于你的安装位置。你可以 下载 JDK 见此处¥add
JAVA_HOME. Its value depends on where you installed it. You can download the JDK here
你可以通过在控制台中输入
echo %ENVIRONMENT_VARIABLE%来检查环境变量的值。¥You can check the value of an environment variable by typing in console
echo %ENVIRONMENT_VARIABLE%.
如果你有用于命令提示符或 Powershell 的初始化脚本,可以尝试以下方法:
¥If you have an init script for your command prompt or powershell, you can try this:
setx ANDROID_HOME "%USERPROFILE%\AppData\Local\Android\Sdk"
setx ANDROID_SDK_ROOT "%USERPROFILE%\AppData\Local\Android\Sdk"
setx path "%path%;%ANDROID_SDK_ROOT%\tools;%ANDROID_SDK_ROOT%\platform-tools;<gradle_path>\bin;"安装工具后,请使用正确的 SDK 设置 Android Studio 并创建虚拟机。
¥After the tools are installed, set up Android Studio with the correct SDK and create a virtual machine.
启动 Android Studio(检查安装文件夹中的可执行文件)。下一步是安装各个 SDK:
¥Start Android Studio (check the executable in the folder that you installed it in). The next step is to install the individual SDKs:
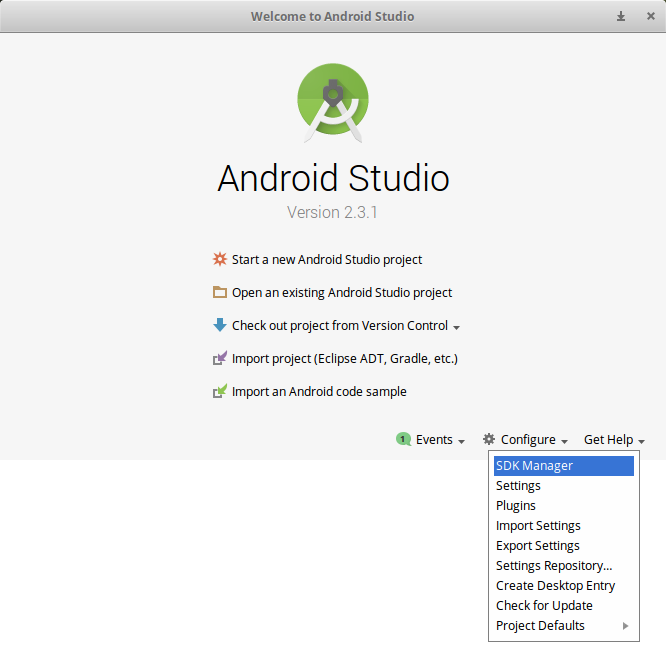
打开窗口底部的 “配置” 菜单:
¥Open the “Configure” menu at the bottom of the window:

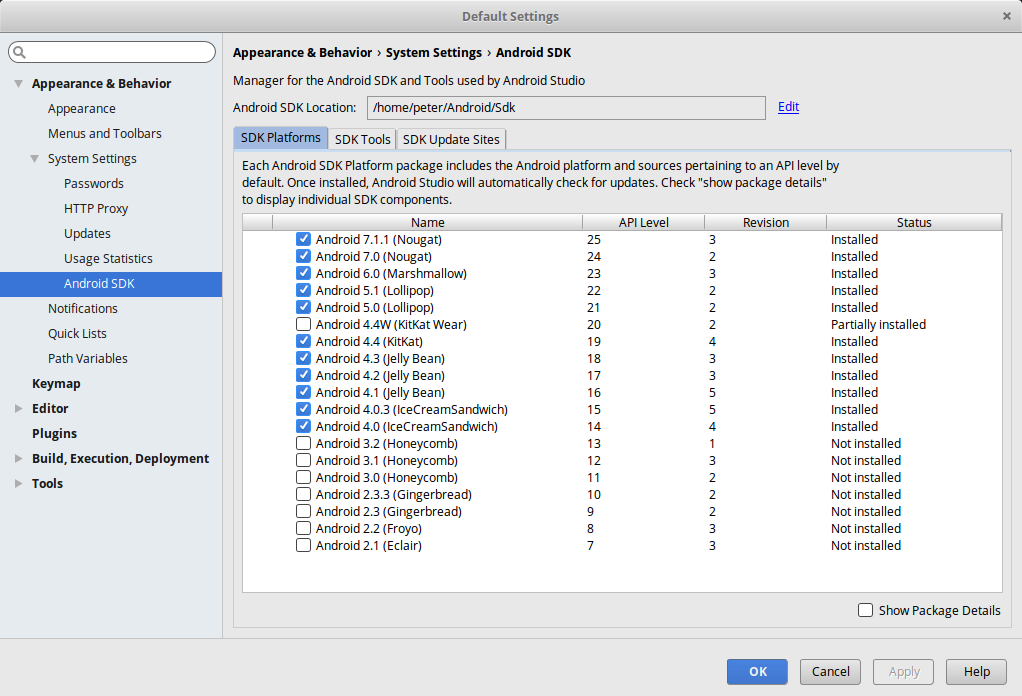
选择所需的 SDK。截至 2019 年 12 月,Cordova 需要 android-28(Android 9.0 - Pie),因此请务必将其包含在内。点击 “适用” 即可安装 SDK。
¥Select the desired SDKs. As of December 2019, Cordova requires android-28 (Android 9.0 - Pie) so be sure to include it. Click on “Apply” to install the SDKs.

iOS 设置(iOS Setup)
¥iOS Setup
你需要一个安装了 Xcode 的 macOS 系统。安装完成后,打开 Xcode 获取许可证提示。接受许可证,然后你可以关闭它。
¥You will need a macOS with Xcode installed. After you’ve installed it, open Xcode in order to get the license prompt. Accept the license, then you can close it.
步骤 2:添加 Cordova Quasar 模式(Step 2: Add Cordova Quasar Mode)
¥Step 2: Add Cordova Quasar Mode
为了开发/构建移动应用,我们需要将 Cordova 模式添加到我们的 Quasar 项目中。它的作用是使用 Cordova CLI 在 /src-cordova 文件夹中生成一个 Cordova 项目。每次构建时,/src-cordova/www 文件夹都会被覆盖。
¥In order to develop/build a Mobile app, we need to add the Cordova mode to our Quasar project. What this does is that it uses Cordova CLI to generate a Cordova project in the /src-cordova folder. The /src-cordova/www folder will be overwritten each time you build.
$ quasar mode add cordova步骤 3:添加平台(Step 3: Add Platform)
¥Step 3: Add Platform
要切换到 Cordova 项目,请输入:
¥To switch to the Cordova project, type:
$ cd src-cordovaQuasar CLI 会根据需要安装目标平台。但是,如果你想手动添加平台,请输入:
¥Target platforms get installed on demand by Quasar CLI. However, if you want to add a platform manually, type:
$ cordova platform add [android|ios]要验证一切正常,请输入:
¥To verify that everything is in order, type:
$ cordova requirements在某些较新的基于 Debian 的操作系统上,运行
cordova requirements时可能会遇到一个非常棘手的问题。请参阅 “未找到 Android SDK” 安装后 部分以获取帮助。¥On some newer Debian-based operating systems you might face a very persistent problem when running
cordova requirements. Please see the “Android SDK not found” after installation section for assistance.
切换到 iOS WkWebView(Switching to iOS WkWebView)
¥Switching to iOS WkWebView
强烈建议切换到 WKWebView(但可选!),因为 UIWebView 在 iOS 12.0 中已被弃用,如这篇 Cordova 博客文章所述:https://cordova.apache.org/news/2018/08/01/future-cordova-ios-webview.html。
¥Switching to WKWebView is highly recommended (but optional!) as UIWebView has been deprecated in iOS 12.0 as described in this Cordova blog post: https://cordova.apache.org/news/2018/08/01/future-cordova-ios-webview.html.
但是,如果你想替换默认的 Web 视图,请谨慎选择。每个模式都有各自的注意事项。请确保你访问了上面的链接。
¥However, choose wisely if you want to replace the default Web View. Each comes with its own caveats. Make sure that you visit the link above.
选项 1:Ionic Webview 插件(Option 1: Ionic Webview Plugin)
¥Option 1: Ionic Webview Plugin
安装 Ionic Webview 插件
¥Install Ionic Webview Plugin
# from /src-cordova
$ cordova plugin add cordova-plugin-ionic-webview将
ScrollEnabled首选项添加到Config.xml¥Add
ScrollEnabledpreference toConfig.xml
<platform name="ios">
  <preference name="ScrollEnabled" value="true" />
</platform>有关 WkWebViewPlugin 的注意事项,请参阅 Ionic 文档。
¥Consult Ionic Docs for caveats on WkWebViewPlugin
选项 2:Cordova WkWebviewEngine 插件(Option 2: Cordova WkWebviewEngine Plugin)
¥Option 2: Cordova WkWebviewEngine Plugin
安装 Cordova WkWebviewEngine 插件
¥Install Cordova WkWebviewEngine Plugin
# from /src-cordova
$ cordova plugin add cordova-plugin-wkwebview-engine有关注意事项和更多信息,请访问:https://github.com/apache/cordova-plugin-wkwebview-engine
¥For caveats and more info, visit: https://github.com/apache/cordova-plugin-wkwebview-engine
步骤 4:开始开发(Step 4: Start Developing)
¥Step 4: Start Developing
你可以使用以下命令启动开发服务器:
¥You can start the development server with the command below:
$ quasar dev -m cordova -T [android|ios]

# passing extra parameters and/or options to
# underlying "cordova" executable:
$ quasar dev -m ios -- some params --and options --here
# when on Windows and using PowerShell:
$ quasar dev -m ios '--' some params --and options --here这还会添加 Cordova 模式,并在缺少相关 Cordova 平台时自动安装。
¥This will also add Cordova mode and install the related Cordova platform automatically if it is missing.
如果你有移动设备,你可以在移动设备上运行该应用,或者通过模拟器运行。有关更多信息,请参阅 移动应用构建命令 > 开发。
¥You will be able to run the app on your mobile device if you have one, or through the emulator. See Mobile App Build Commands > Developing for more information.
警告
在 Android Studio 中,你将收到一条建议升级 Gradle 版本的消息。请勿升级 GRADLE,因为它会破坏 Cordova 项目。其他任何升级请求也是如此。
¥In Android Studio, you will be greeted with a message recommending to upgrade the Gradle version. DO NOT UPGRADE GRADLE as it will break the Cordova project. The same goes for any other requested upgrades.

如果你遇到任何 IDE 错误,请点击“文件”>“使缓存无效”,然后重新启动。
¥If you encounter any IDE errors then click on File > Invalidate caches and restart.
